Startup Chronicles: From Conception to Market Dominance (Part 2)
Setting up your Nestjs project and configurations for development and test database.

Development Phase:
In this part of the series, we will be getting our hands dirty, we will be starting with the creation of a high-level design, and then a low-level design of our inventory management system. We will proceed to create an Entity Relationship Diagram and Normalise our database tables, to wrap this part up, we will set up a Nestjs application, And in the next part, we will implement an End-To-End Test, Logging, caching, and Rate limiting to our system. Also, we will containerize our application with docker to make it ready for deployment.
High-Level design
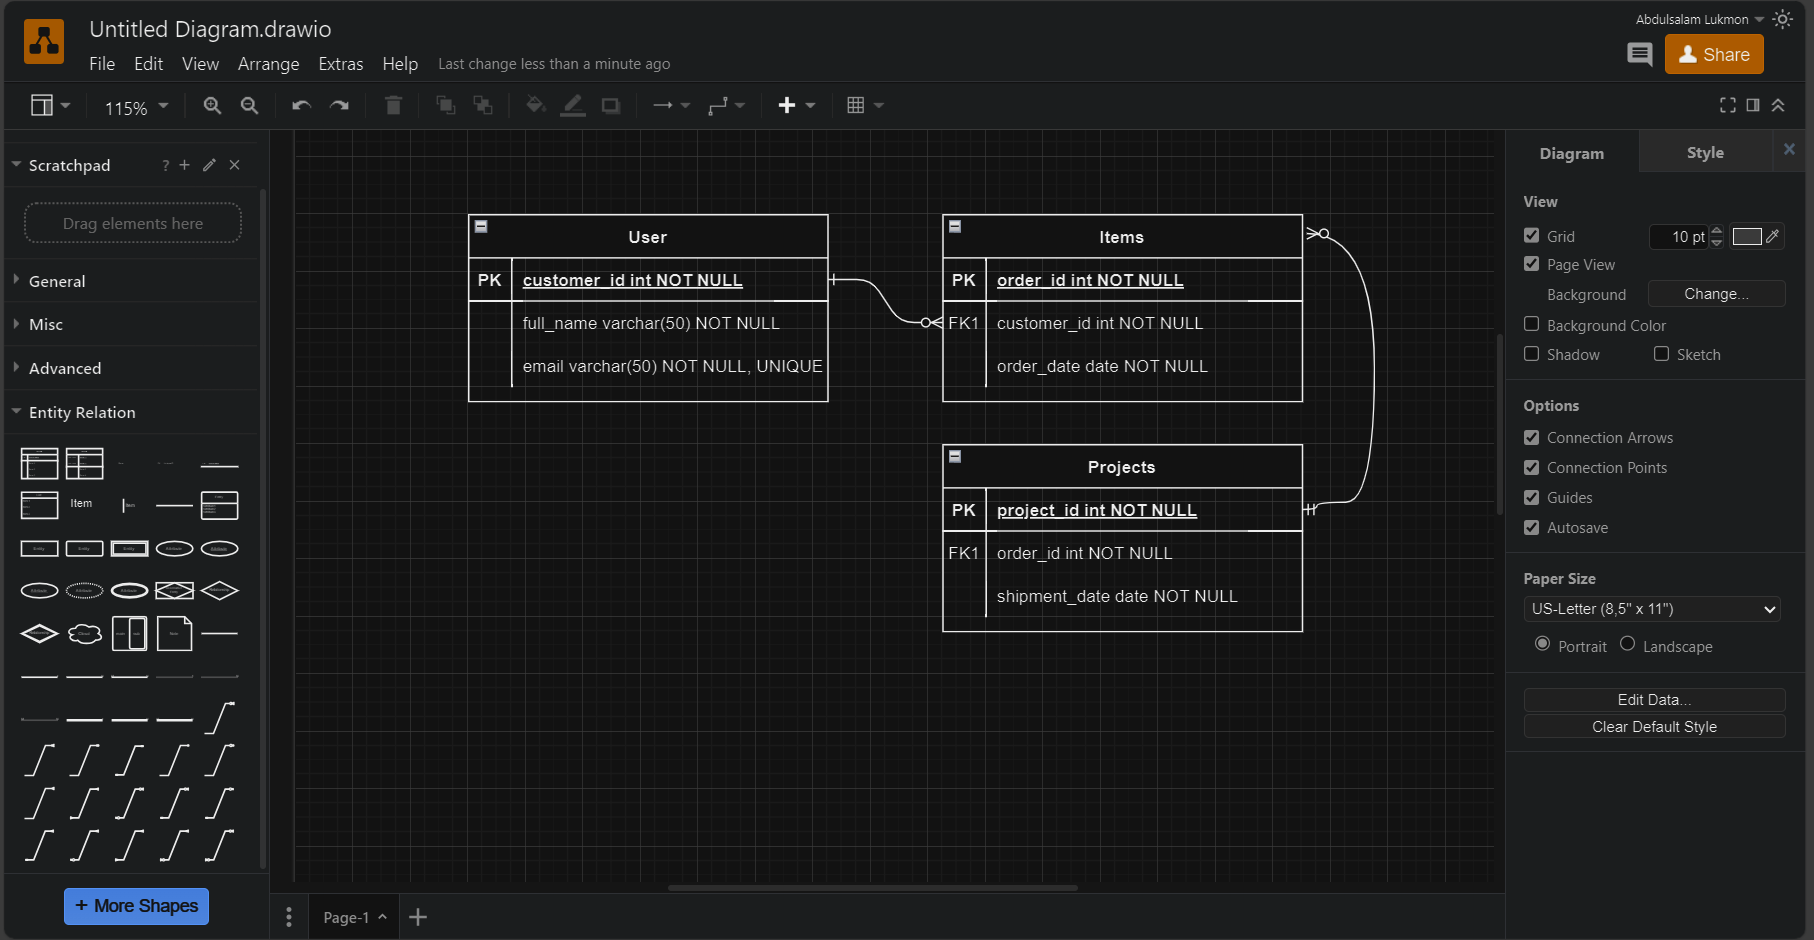
The high-level design gives us a bird's eye view of the system in question, and there are different tools used to create a high-level design, but for our case, we will be using draw.io. The image below shows the UI of Draw.io
From the problem statement, Our system has 3 main functional requirements, the requirements are:
Managing overall inventories of the organization
Manage projects teams
Manage team inventories
But our primary focus here is Inventory management, which will be our primary focus.
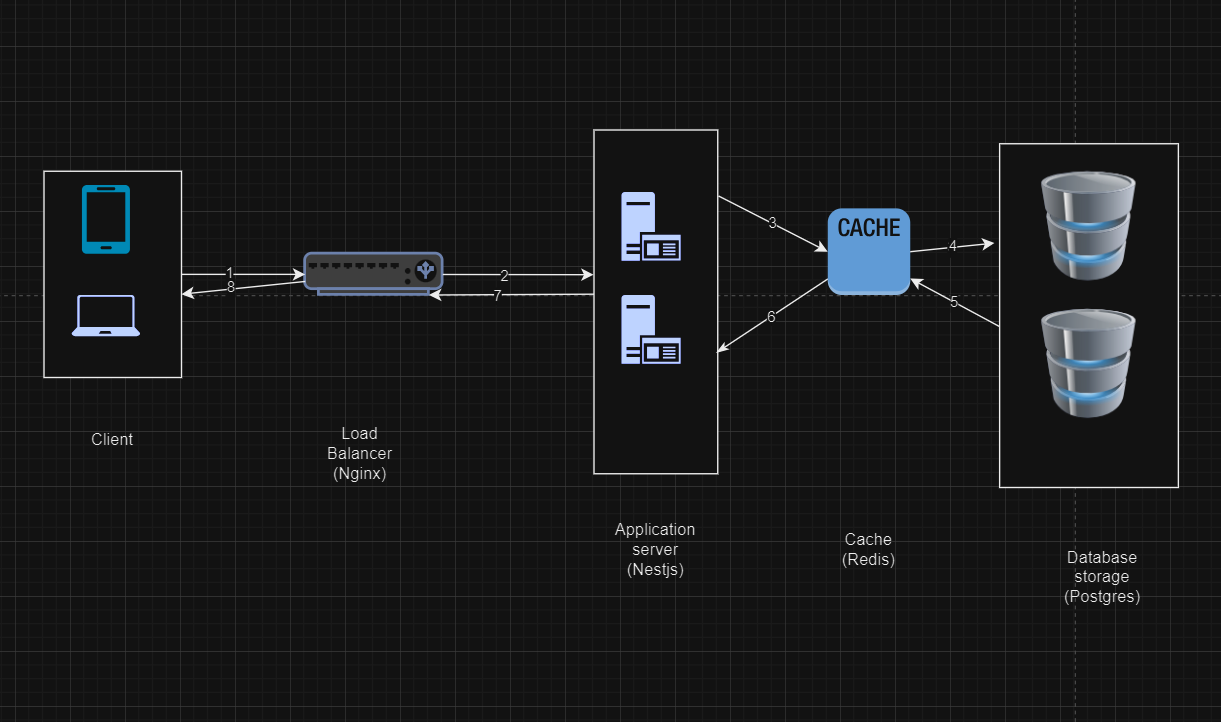
Generally, the high-level design of our system will look like the image above. The explanation of steps involved are explained below. For instance, the warehouse manager sends a request for a particular item in the inventory
1: The client sends a request, and the request is been received by the load balancer
2: The load balancer routes the request to the available application server
3: The Application server processes the request payload, then checks the cache if the data required is in the cache
4: If the data required is in the cache, the data is sent to the application server, if not, the request proceeds to the database to get the data
5: The request checks for the data in the database and returns the data to the cache.
6: The cache sends the response to the application server
7: The application server sends the response to the load balancer,
8: The load balance sends the response to the client.
Entity Relationship Diagram and Database Normalisation.
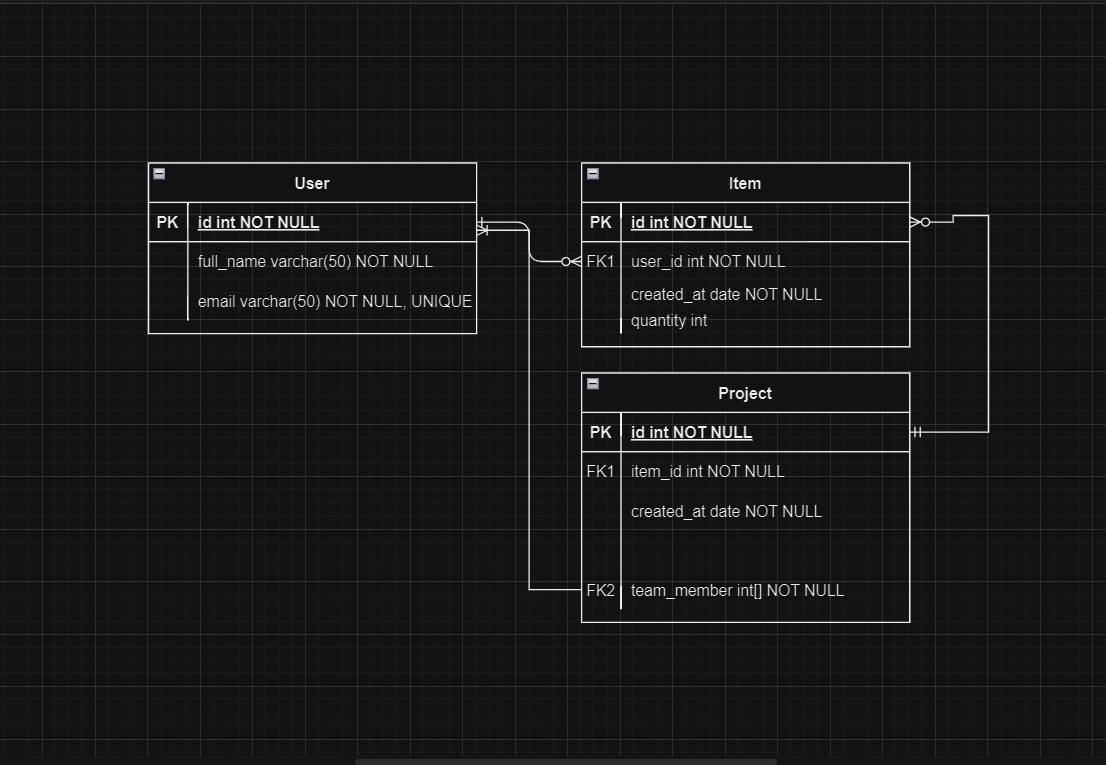
First, we need to note that, the items will be added by an end user, and also, a group of items will be used in a project, and also note that a project team consists of at least one user. The relationship between the entities in our system can be represented visually as shown in the image below.
Next, we need to design our database schema, the tool we will be using for that is Dbdiagram.io, although, Draw.io can be used to create the schema, Dbdiagram gives us more flexibility and the ability to export an SQL file for our database schema. It supports popular database drivers like MySQL and Postgres. And also allows sharing your database schema with your team for collaboration.
Based on our Entity relationship diagram, we created the table for our entity and the relationships on DBdiagram.io, the table is shown below

Project Setup
We have our entities sorted, next will be setting up our application, and we will be using Nestjs, which is used to build scalable server-side Nodejs applications. To set up a Nestjs application, you need the following pre-requisite.
Nodejs v16 or higher
Nestjs CLI
An Integrated Development Environment, IDE
Docker
After installation of Nodejs, we will run the command below to install Nestjs globally.
npm i -g @nestjs/cli
Next, we need to instantiate our project using the Nest CLI, using the command below.
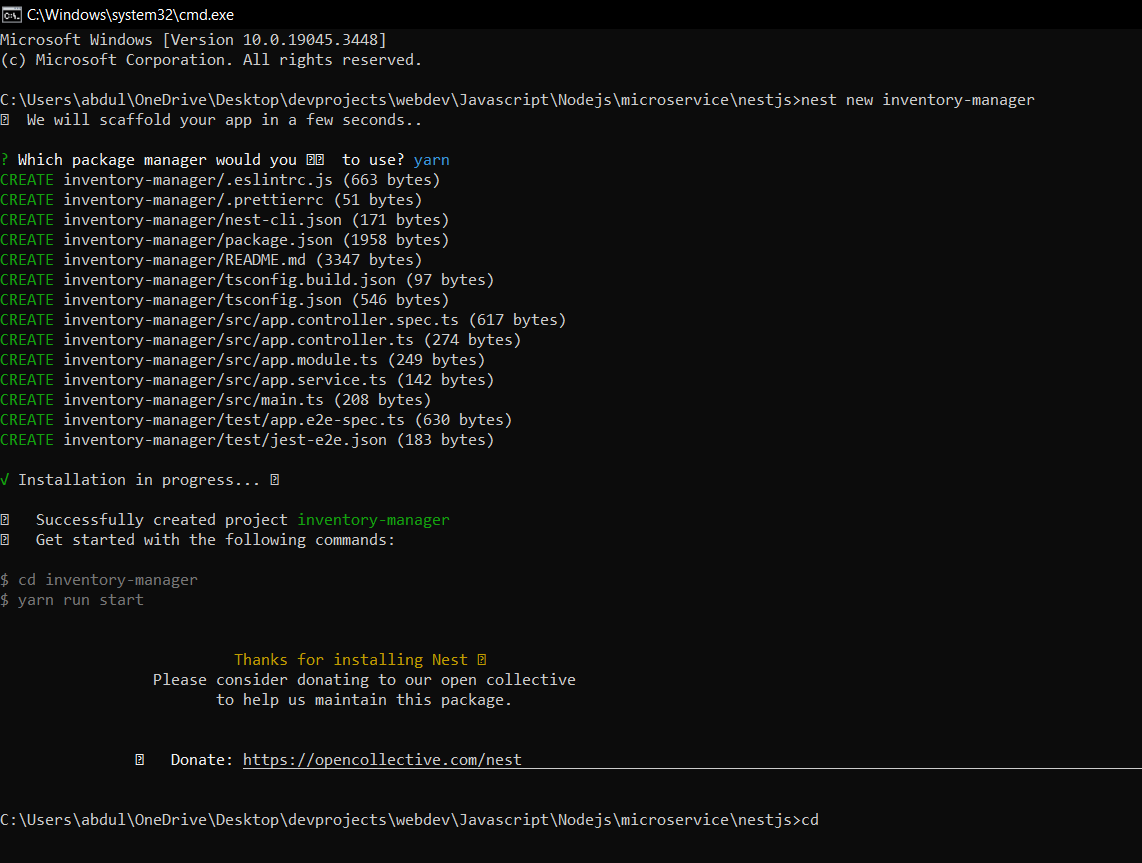
nest new inventory-manager
We will be provided with an option to choose a package manager, we will go with yarn. This will take some seconds to scaffold our application
Our application has 3 main entities, which are Item, User, and Project. Nestjs provides us with a modular approach to development, so we will create a module for each of our entities, in addition, we will create a database module, to help manage our database connection.
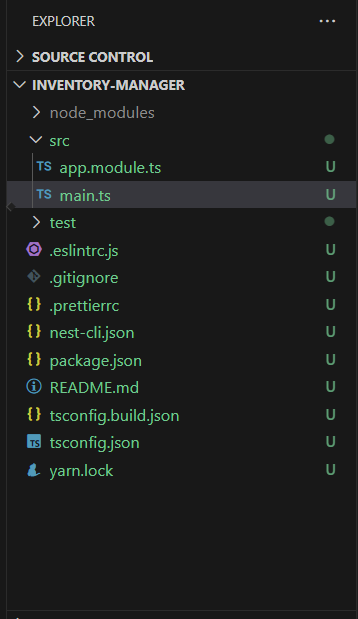
First, we will clean up our src folder, and then create our modules. After the cleanup, our src folder should look like this,
To set up our modules, we will run the following command in the terminal
nest g mo user --no-spec
nest g mo project --no-spec
nest g mo item --no-spec
nest g mo database --no-spec
Next, we will be setting up controllers for each of our modules excluding the database module. controllers are API endpoints that receive POST, GET, DELETE, and PUT requests. The command below helps create a controller for each of our modules.
The --no-spec flag, prevents the addition of a test file to our newly created component.
nest g co user --no-spec
nest g co project --no-spec
nest g co item --no-spec
Also, we will be adding services to each of our modules, the concept of services is a handler for our business logic, this just helps organize our code base. The command to add service to our module is shown below:
nest g service user --no-spec
nest g service project --no-spec
nest g service item --no-spec
nest g service database --no-spec
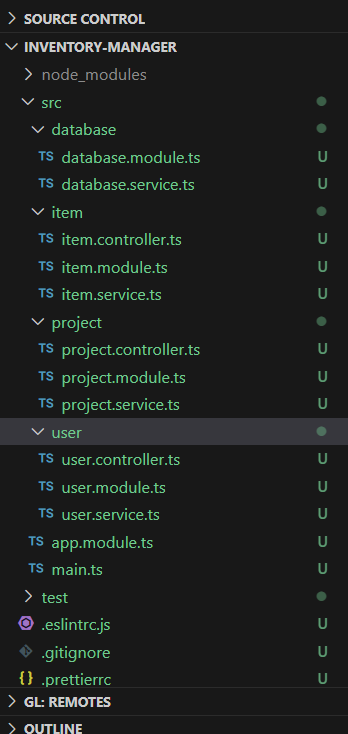
After all the addition of the controllers and services, our application folder should look like the image shown below.
Next, we will be setting up our database using Prisma. But we need to install the Prisma package and the Prisma CLI. To do that, we will type the code below in our terminal
yarn add prisma -D
yarn add @prisma/client
npx prisma init
The last command will create a Prisma folder and a .env file.
In the Prisma folder, there will be a schema. Prisma file, this is where we will define our database schema. We will replace the content of the file with the content below
generator client {
  provider = "prisma-client-js"
}

datasource db {
  provider = "postgresql"
  url      = env("DATABASE_URL")
}

model User {
  id        Int       @id @default(autoincrement())
  email     String    @unique
  firstName String?
  lastName  String?
  password  String
  Item      Item[]
  Project   Project[]
}

model Item {
  id          Int      @id @default(autoincrement())
  name        String
  description String?
  createdById Int
  created_by  User     @relation(fields: [createdById], references: [id])
  quantity    Int
  variations  String[]
}

model Project {
  id          Int     @id @default(autoincrement())
  team_name   String
  description String?
  createdById Int
  created_by  User    @relation(fields: [createdById], references: [id])
}
Save the file, and run "npx prisma validate", to ensure our schema is error-free. If no error, we will proceed to generate our artifacts and types of our schema with the command, "npx prisma generate". Lastly, we will need to generate a migration file for our database. We will do that with the command, "npx prisma migrate dev". It will request a name for our migration, since it is our first migration, we will call it, database_init and proceed.
PS: A migration file is an SQL file for applying and reverting changes to a database
Next, we need a database for our application, we will use a local instance of Postgres running in docker. We will need two instances, one for testing and the other for actual development. To do that, we will create a docker-compose.yml file, the content of the file is shown below.
version: "3.1"

services:
  devDB:
    image: postgres:15.0
    container_name: devDB
    ports:
      - 1000:5432
    environment:
      - POSTGRES_PASSWORD=dev
      - POSTGRES_USER=dev
      - POSTGRES_DB=dev
    volumes:
      - ./dev-data:/var/lib/postgresql/data
  testDB:
    image: postgres:15.0
    container_name: testDB
    ports:
      - 1001:5432
    environment:
      - POSTGRES_PASSWORD=test
      - POSTGRES_USER=test
      - POSTGRES_DB=test
    volumes:
      - ./test-data:/var/lib/postgresql/data

volumes:
  data:
Note: Ensure docker is running on your local PC
Now we need to start the database with the command below:
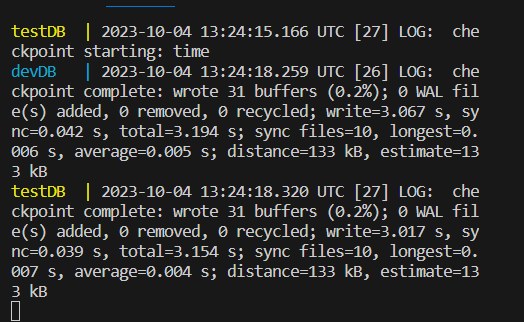
docker compose up
The output below shows our databases are up and running.
Next, we need to create an environment file for our test database, because by default prisma connects to the .env file in our root folder. So we need to create a .env.test file and replace the content of .env and .env.test files with the following
#.env
DATABASE_URL="postgresql://dev:dev@localhost:1000/dev?schema=public"
#.env.test
DATABASE_URL="postgresql://test:test@localhost:1001/test?schema=public"
But there is another problem, if we run our application, how do we switch between, the test and development database? That is why we need a package to help notify our Application which .env file to use.
The package we will be using for that is dotenv-cli. Also, we need to include a configuration manager, the popular one is "dotenv", but Nestjs provides us with a config module, so we will add that to our project too. we will install the two packages with the command below
yarn add -D dotenv-cli
yarn add @nestjs/config
After installing the packages, we will be making some adjustments to some files, which are the app.module.ts, database.service.ts, database.modulets.ts, and package.json files.
In the app.module.ts, we will import the prebuilt config module, and make the config available globally in our application. After updating our app.module.ts, it should look like the content shown below:
import { Module } from '@nestjs/common';
import { UserModule } from './user/user.module';
import { ProjectModule } from './project/project.module';
import { ItemModule } from './item/item.module';
import { DatabaseModule } from './database/database.module';
import { ConfigModule } from '@nestjs/config';

@Module({
  imports: [
    ConfigModule.forRoot({
      isGlobal: true,
    }),
    UserModule,
    ProjectModule,
    ItemModule,
    DatabaseModule,
  ],
  controllers: [],
  providers: [],
})
export class AppModule {}
In the database.service.ts file, we need to get the database URL with the config module and connect to it. After updating the file, it should look like the snippet below:
import { Injectable } from '@nestjs/common';
import { ConfigService } from '@nestjs/config';
import { PrismaClient } from '@prisma/client';

@Injectable()
export class DatabaseService extends PrismaClient {
  constructor(config: ConfigService) {
    super({
      datasources: {
        db: {
          url: config.get<string>('DATABASE_URL'),
        },
      },
    });
  }
}
Also, in our database.module.ts file, lots of other modules depend on it, so we will export it, and make it globally available. After updating the file, it should look like the snippet below:
import { Global, Module } from '@nestjs/common';
import { DatabaseService } from './database.service';

@Global()
@Module({
  providers: [DatabaseService],
  exports: [DatabaseService],
})
export class DatabaseModule {}
Lastly, We need to differentiate our test and development databases and ensure both are up and running with a unique command. This is where the package.json file comes in handy. We will create a command to set up and tear down each of our databases, to do that we will update our package.json file script section. We will prepend the following command for the test and dev databases respectively.
PS: what we are doing with this command can be summarized as, remove database container -> start up database -> restart our database connect
/// Other part of the package.json file remain the same
 "scripts": {
    "test:db:deploy": "dotenv -e .env.test -- prisma migrate deploy",
    "test:db:rm": "docker compose rm -s -f -v testDB",
    "test:db:up": "docker compose up -d testDB",
    "test:restart": "yarn test:db:rm && yarn test:db:up && sleep 5  && yarn test:db:deploy",
    "dev:db:deploy": "prisma migrate deploy",
    "dev:db:rm": "docker compose rm -s -f -v devDB",
    "dev:db:up": "docker compose up -d devDB",
    "dev:restart": "yarn dev:db:rm && yarn dev:db:up && sleep 5  && yarn dev:db:deploy",

        // ... other part of the script section remains the same

}
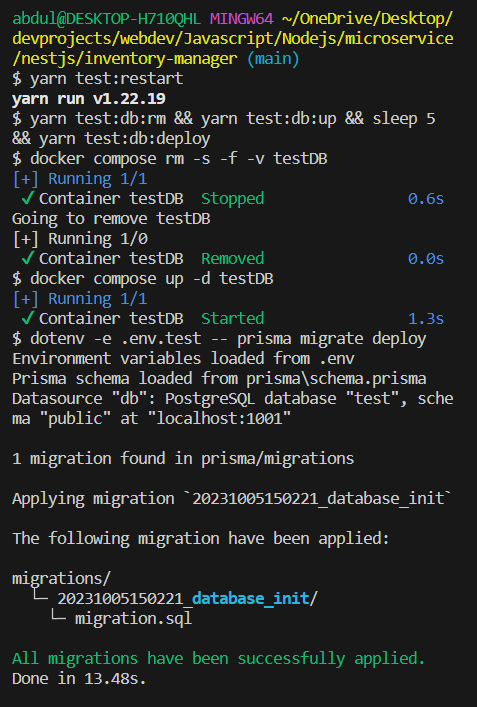
Now to test if our setup is working well, we will run this command in two separate terminals,
yarn test:restart
yarn dev:restart
The output should be like the image shown below.
Alas, We are done setting up our application, but that was a lot of setup.
PS: In case your final setup is not working fine, you can check the code repository here on Gitlab
In the next part of the series, we will be using an End-to-End Test to guide our application flow.
Thanks for reading up to this point, see you in the next part 🚀


